
Problem solving
11/03/2020
Problem:
I tried to log in to NKC moodle/ myday, however, the page wouldn't load, and it would say that I couldn't access it and that I had to check my connection. I've had a similar issue before and fixed it by logging out and the Mac and restarting it. However this time it didn't work, even after I tried 4 times. I wasn't sure what to do next so I asked my tutor, Mike, for help but he didn't know what to do either.
Solution(ish):
I was going back and forth trying to figure out what to next, then I realised that I was signed to my google account, so I thought that maybe if I signed out from my google account and then go to moddle and try again it might work. So that's what I did, in desperate attempt to get to my school onedrive. It did work at the end, however, I'm not sure how and why, and I don't understand why it keeps happening? Maybe next time the issue comes back I should talk to the IT guys to understand why this keeps happening.
12/03/2020
The same problem appeared today too, I tried the same things from yesterday, signed out from my google account, and restart, but it didn't help, so I asked my tutor Deb for help, and she advised me to clear the browser history ( I am using Google Chrome), quit chrome and then open it again and try to sign to myday, which worked.


13/03/2020
Adding my pitch to my context page
I have seen my classmates adding their Power point presentations with their pitches to their context pages. I wanted to do the same, instead taking screenshots of the presentation, because I had some gifs there, however I didn't how. I asked my friend Lily, and she told me to go to "Add" on my wix website builder, go to "more" and then croll down to "document buttons". There I found power point selected it and then had to upload my power point presentation from the desktop to the website.

18/03/2020
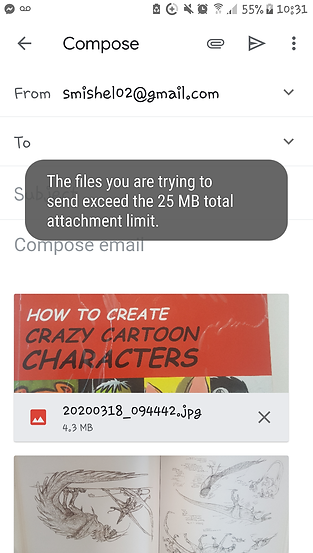
I wanted to transfer the photos I have taken from the book "how to create crazy cartoon characters" from my phone to the mac I was using via Gmail. The problem arose when I wanted to attach the photos (more than 5), I text popped up saying I can't send anything exceeding 25mb. Since I had a lot of images sending them in groups what not an option since I could get confused and send one image twice by an accident.
I went to the Myday app on my phone and then went moodle and signed in to one drive. I entered a folder I have especially created for the FMP, and made a new folder for photos.
To add the files I had to go to the option add-> file -> Recent, and select all of the photos I wanted. Then I just go to Onedrive on the Mac and download the photos.
19/03/2020

I made sure that it was enabled on the Wix editor page, changed the language setting from American English to British English and I was ready to go.
At home, when I was working on the website, my spelling correction wouldn't work. So I went to chrome extensions, by chest typing that on the search bar. Then when I was in the chrome web store I typed spelling corrector in the search bar there, and then I looked at some spelling correctors, and at the end I choose Grammarly. I set up my account there I choose the free option as I just need my spelling corrected.

26/03/2020

While I was animating and was ready to move to the next pose I noticed that some parts of the jacket of the character seem to be surrounded by blue boxes. When I saw that I wasn't sure what they are. I selected and the selected the jacket couple of time and nothing changed, then I checked the previous frames but they were normal.
I went to google to help me, but since I didn't know what those boxes were I wasn't able to find what I need to help me, I tried to get some help from youtube, but there were no results that could help me.
At this point I had two options:
-
To find what the problem is myself
-
To continue the rest of the scene with those boxes.
I thought that because I have used the line tool to draw some areas of the jacket maybe they would be counted as a different object. So I drew a line using the Paintbrush tool, and another line using the line tool, and then selected them to see if there was any difference. There was nothing out of the ordinary, and definitely no blue boxes.
Then the thought that the lines may be separate objects, gave me the idea to see if the jacket or any of its parts have been turned into a symbol by an accident!

My assumption was correct! Some of the lines were turned into an object by an accident since the option to turn them into an object was missing and instead, there was the "Break apart" option, which I learned about after the glow effect tutorial I watched. I clicked the option and that broke down all the objects. Now when I selected the jacket there were no more blue boxes!
04/04/2020

I was stuck in a situation where I had to animate the wings emerge, but since the character was scaling down I had to find a way of synchronising them.
I did an attempt, which didn't work out well. I didn't have any ideas what to do, so I just tried to scale down the wings with every next frame but, that way the effect of the emergence was lost, and the motion looked a bit weird.
I wanted a 3rd party to have a look at the first attempt I did and maybe suggest an improvement or help me come up with a solution to the problem I have myself no. That is why I asked my dad for an opinion on the matter since he is usually very critical about stuff, and gives me useful feedback on my work, ( I usually forget to add his advice on the pages but this time I managed to write everything we discussed on paper). He suggested keeping the size of the object/substance and the wing the same size on all layers, while the character was getting smaller, to keep the effect to the "wings" actually emerging. Basically as the wing " explodes " I keep all of the frames the same size as the previous one but just move the particles and substance around. This is one of the options we came up with> I think it is a pretty solid solution but it will need testing.
Another option, that I came up based on my conversation with my dad can take a while to do but I think it will be the best solution for this situation. This idea popped up when my dad asked if I could size down the character and the wings together, and I answered no because the character animation was tweeted. However after some thinking on his question, I thought that I can duplicate the character layer and remove the tween, but still keep the tweened version. Then I will select both the wings and the character, and while being guided by the tweened layer I will start scaling down both the character and the wings together and will try to match the frames of the tweened layer as closely as I can, but I will have to do that in twos since the wing animation is on twos as well.
We both (me and my dad) agreed that the 2nd option has a better plan and generally seems more likely to actually work, so I decided that I will go with this option for now, and see how it works out.

So First I went for the second option as it seems to be more successful. First of I created a copy of the current flat. file and rename it. In case I don't like the outcome of this option I will use the original file, and if I do like the outcome I will keep working on the renamed one.
I had to keep the character the same size throughout the end of the emergence of the wing, and animate the wings according to that scale, so for the last couple of frames, I had to work outside of the "canvas".
Once I got to actually zooming out I realised that both of the ideas are just not going to work. When I attempted to follow the plan I set I realised how many different moving parts I had to worry about and include every time I moved to a new frame. I started to feel worried rather this was going to work even while I was still working on the wings.
I had to find another option so I went straight to youtube to help me find a solution. I found a video about the "camera tool" so I checked it out. The person on the tutorial had the same problem as me - he had a lot of individual frames that were animated and he had to zoom the scene in.
I created a copy of the file I was working on, just in case something doesn't go as planned, and I tried out the camera tool. I created a keyframe where I wanted the zoom out to start and then created another where I wanted it to end. I used the camera zoom bar, which appears above the timeline, to zoom out the whole scene.
It was very easy and quick to control the camera angles with the camera, much better than my original plans, and it worked out pretty well. The only issue (well not really an issue) was that the camera will apply to all other scenes unless I set up keyframes were I want the camera to be applied to. Also If I plan to animate another scene where I will need to use the camera tool I will need to check the scale of the camera and without a camera, because when I turn off the camera tool the scenes might be a different scale.

13/04/2020
This is a test I did to try how shape tween will change colour if I had multiple colours on one layer and they all un one colour. As can be seen, this didn't work out how I imagined, but I was prepared that this might happen. Because this test was unsuccessful it meant that I will have to do each colour on a different layer and use the eyedropper too to make sure all layers urn into the same colour eventually.

If I were to change the shape of that object then that would do something weird too. In scene 4 I have to ply a shape tween where the colour of the body changes, but then I also have the body of the character get bigger. However, I have had the solution to this problem some time not and it is to create a mask. I learned to do that from Jazza's tutorial on how to animate transformation, that I have on my research page.
20/04/2020

I was finishing off scene 5 and the last thing I needed to do was to add the fade effect at the beginning of the scene. I added a keyframe at the beginning of the scene and added a rectangle of the same colour to the one from scene 4. After I added it I converted it into a symbol and named it fade out. I created a new keyframe what I wanted the tween to end and then I went to properties -> colour effect and selected " Alpha" from the drop-down menu and reduced it to 5-6%. Then I right-clicked on the frames and selected "create a classic tween". When I played the animation, I noticed that the tween wasn't working. I tried a couple more times but it still wasn't working as it should be. It shows have reduced the density of the colour gradually but the tween wasn't working at all.
I went back to the tutorial I watched to create a fade and watched closely for anything that I could have potentially missed. I noticed that person in the tutorial used motion tween instead of classic tween, and I thought maybe that was what I was doing wrong so I went back to my animation and did all the same things but I selected Motion Tween instead of Classic tween. It still didn't work, however. At this point, I was just going back and forth thinking about what I could be doing wrong. It seemed that all other tweens in my animation were working fine, so there was no way there was something wrong with the file. I even closed animate and reopened it again, thinking that occasionally animate does funny things, and the only way to fix them is to close the software and open it again, however that didn't work as well.

I went back to the fade tutorial and watching over again but this time I paid more attention. I noticed that the person on the tutorial created the Motion tween without adding a keyframe to mark the end of the tween. Instead, he had all the following frames removed. To create the fade effect they just clicked on the final frame went to properties, went to colour effects and then Reduced the alpha, and that create a dot on the frame he was on. I repeated the same steps, and finally, the fade worked.
It is funny in a way that I forgot this small detail because I used fade for scene 4, and it weird that I couldn't remember hat this is what I did. This small thing put me in a state of panic for the time I couldn't find the cause of the problem. This is to show that it is important to have all the tutorials and references that I have looked at, somewhere that I can access them when I need them.
22/04/2020
So I have had this issue since I started working exclusively at home due to the COVID-19. When I want to render my animation, files are being exported files and look like this:

(To render files from animate I go to File-> Export -> Export Video..., then I get this window, I usually have "covert video in media encoder" and click "Export".

When I click on the exported files the player tries to play the file, but then A window appears with the message " The item was encoded in a format that's not supported". This means that The player I am using doesn't support the format that comes straight from animate.
As I mentioned previously I've had this problem for a long time, but I didn't really pay it any attention because when I upload these "videos" to Wix, they work.


Though it wasn't a big issue, yet I wanted to be able to play my rendered animation on my computer. I don't know If these files are going to work I upload them anywhere else other than Wix, so I wanted to make sure that I have a way to make those files playable. I opened "Adobe Media Encoder" and dragged the file to the Queue box, on the right-hand side. Then I went to the bottom of the window to choose format to convert the video to.
I found the format H.264 and I choose "High Quality 1080 HD" then back to the queue box I pressed the green arrow to convert the file. I went back to my desktop after the file was converted and now the file looked like this:

When I clicked on it worked just fine, so I was glad I had this option.
I was a little confused when I rendered on my computer for the first time because the rendered file wasn't playing. I also noticed that after I click on export I was not being sent directly to "Adobe Media Encoder" (in college once I click export I was being sent to Media Encoder, so I found this quite strange). Because I wasn't being sent to Media Encoder I will have to open it myself whenever I want to render my files, because to have them play I need to convert them".
23/04/2020

While I was colouring the 1st scene I encountered 3 minor problems that I fixed quickly.
The first one was that the hair colour had turned the same colour as the skin. I checked all previous frames to see if there were affected but luckily they were fine. To fix this problem I used the lasso too to select the hair, then I went to select the colour of the hair and I clicked on it
The second one was that there was some line work that passes the lines where they should end. When I was doing the outlined, I thought that when I start colouring I would just cover them up with the colour, but later I decided that all colours will be under all line work, which meant that I won't be able to cover them with colour.

To fix this I had to go back to the outlines layers, the jacket layer in particular, and erase all the lines that were where they shouldn't be.

The last problem was similar to the second. In places where the hands were overlapping with the legs, I had covered the outlines with white so I don't get confused. Similar to the second problem I had to go back to the outlines layer and erase the white spots, in order to be able to colour the hand with the correct colour.
08/05/2020


While I was working on the shading and I was going back and forth to check how everything looked, I noticed that in scenes 4 and 5 the shading frames that I had, were not matching the frames for the colour and line work, and overall was looking out of place.
I remembered that when I was working on scene 3, I have added and removed excess frames, which might be the reason why the shading and the animation don't match for scene 4 and 5.
Now that I knew what the problem was I had to find out how many extra frames I have to add/remove. I opened the folder of scene 4 and I compared the keyframes there to the keyframes of the shading since they should be matching. I found out I needed to add 2 more empty frames between scene 3 and 4, by right-clicking on the empty frames between the two scenes, then clicking on insert frame. I did that twice. I checked the scenes again (4 and 5) and as I expected everything has gone back to how it should be.
This was a very quickly solved issue, and even if didn't know exactly what caused it, eventually I would have realised that the frames weren't matching.
09/05/2020

I played the rendered animation and saw there was a slight problem with scene 5 where the shadow is absent, and then suddenly appears.
This first thing I did was to go back to the file go to scene5 and move the keyframe of the shadow for this scene slightly backwards to make sure that it doesn't appear suddenly, however this way the shadow was too dark during the fade-out process so it looked quite unrealistic.
Immediately after this I decided to move the whole shadow layer under the fade layer of scene 5. I did that so the fade could have its effect over the shadow too, and that way make it appear gradually.
I thought that it might be a problem to the other scenes, but since scene 5 folder is above all others, and the shadow layer is the second top layer in that folder, colour or anything else, on other layers shouldn't be able to cover the shadow and to make sure I played to review, by pressing "control" + "Enter"
13/05/2020

When I was evaluating I was looking at my production schedule and noticed that after updating the schedule I have forgotten to add week 8. It is good that I managed to catch it before the final evaluation, because then I would have had this issue to fix when I was focusing on evaluating the whole project.
I opened my college one drive, then I found the folder I specifically created at the beginning of the project so I could upload all my stuff for the FMP there. I found the proposal for from UAL where my schedule was, and then from there, I went to view and clicked reading mode. I scrolled down to find week 8 and when I did I ook a screenshot, went back to the website and added it to the schedule.
