
weeks 7-10
Continuing production...
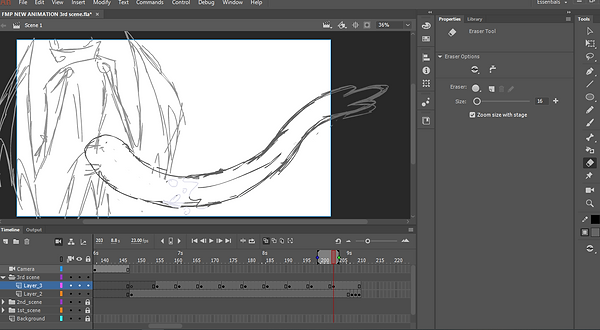
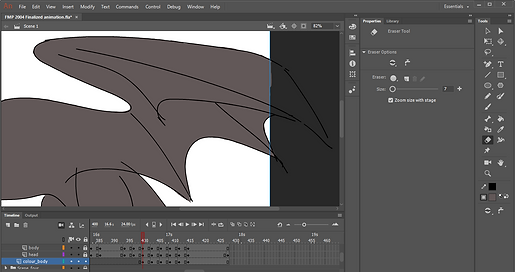
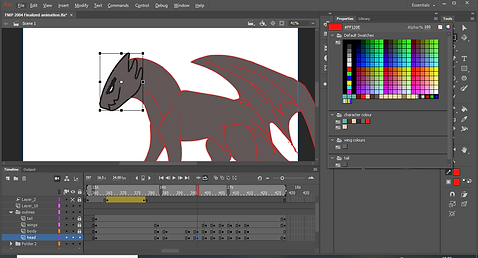
After I finished with the outlines of the wing it was time to move on to the left-wing.
Firstly I created a new folder inside the scene folder and named it left wing. I added a new layer in that folder, and try I copied all the layer from the right wing folder. I made sure that the right wing folder was locked, so I don't get anything messed up while I was flipping the wings.
To flip the wings I would select them with "free selection tool", and I would have all of the layers for the left wing unlocked so I can select them together. After selecting the object I would right-click on it then I would go to "Transform" and then to "Flip Horizontal", which basically flips the object horizontally.

After flipping the wing I had to adjust it so it was on the same level as the right-wing and to make sure that both sides are symmetrical. There were lines of that would appear if the wings lined up, which was very helpful. After couple of frames were done I would play the animation to check if the wings lined up and looked symmetrical. I had to move both left-wing and right-wing around a bit to make the line up properly.

Camera tool

After I watched the tutorial on camera tool, I went to try it out. I created a copy of the file I was working, Just in case I mess up something, or if I don't like how it works.
I went to the section above the layers and fount the icon that looks like a camera (the camera tool) and clicked on it. That created a new layer named "camera" and a camera zoom bar which is how I will zoom out the scene.
To scale up or down I drag the white circle in the middle of the cameras zoom bar. I added a keyframe where the substance was getting a lot bigger, and then I created another one where the substance was gone and I left the frames where there were only the wings. I dragged the circle towards the left side as that scales the scene down. Then I played the scene to see how that worked out. I finally was able to relax a little after I found a way to achieve what I envisioned for this scene.


I added a keyframe at the part where the wings clear themselves from the substance. I scaled the up on that keyframe but kept the other two the same. I did that to add more emphasis on the sudden action. I played the scene to see if I was happy and if everything looked good. I was happy with it and was ready to move on to the next one.
This is the 2nd scene fully completed.
(I am not going to add the glow effect to the substance yet, I want to finish the animated parts, and then add effects and colour, but I will definitely add the glow effect to the scene where the character turns into light silhouette.)
Scene 3

Scene 3 in the storyboard was the most detailed, so consequently, I had a very clear image of the scene.
Similar to the rest of the scenes I started with a sketch of the character (includes the wings, since they wouldn't be moving in this scene), and on a separate layer I drew the outlines of the tail.
I started doing the breakdown frames just to get the most important poses ready. I used the brush tool for the sketching. After the main poses were done I created a new layer for the tail and much like how I did the wings from the previous scene I used the brush tool in orange colour and drew over the outlines of the tail for each frame that I had ready.

Once the key poses were done I started doing the in-betweens. Nothing particular happened during that time since that is just filling up, and drawing what is in between the key poses.
When I got to the part where the substance started to dissolve, starting from the lower back where the tail emerges in the first place, I had to animate particles "ripping" from the main substance.

To achieve what I envisioned for this scene I had to do something similar to the previous scene, where the wings extended and the substance started dissolving. However, in this case, the particles had to move in one direction, the one opposite of the dissolving substance. This took some time to do because I had to draw a lot of small particles, over and over again, and to also make sure that they kept moving and didn't look static. To create this variety I used the lasso tool, and the free transform tool a lot, to select and transform the particles.

At the end, where the substance got to the tip of the tail, I animated the particle spread and fly in all directions, similar to how the wings, in scene 2 shook the substance of and it flew away in all directions.
Once that was done I created a new layer and drew the outlines of the character and the wings (together) using the Paintbrush tool.

I thought that the scene ended quite suddenly so I decided to add a bit of tail movement at the end. I animated the tail going up and then down slightly, then I copied those exact layers and passed them next to the original, so that made the wiggling of the tail last longer.
At the end, I created a keyframe on the Camera layer, where the scene started.
I wanted the camera to move left, in order to show the whole tail, I had to drag the whole scene right, using the cursor with the camera icon.
Scene 4


Scene 4 proved to the hardest scene to animate for this project. Unlike the other scenes, I couldn't use a special tool to animate it like how I used the camera tool for the 4th scene. In addition, this was the least planned scene in my storyboard, which made this scene even trickier since I didn't know how to approach it. To help me with the organisation of this scene I went back to a video I watched last year, which is a tutorial on how to animate transformation, which is pretty much what I needed (the tutorial will be on the research page).

I started with a sketch of the Key poses ( the beginning and the End) using a light blue colour. Then I added a frame between those two and drew what was in between. and the I created a keyframe between the first and middle frame and added drew what was in between, and then I did the same for the middle and the last frame. That way I ended up with five main poses. I turned the sketch layer into a guide by right-clicking on in and selecting "Guide", and that way the sketch layer and anything I do on it wouldn't be visible in the rendered animation, which is something I find very useful and is something I Learned from the transformation tutorial, alongside the creation of the main poses. Speaking of which while I was doing them I didn't worry about the location, and just kept all of them, except the start pose, towards the end.

After the main 5 poses were done, I created 3 new layers- one for the character, one for the wings, and one the tail. I started with the character layer and based on the guide layer I started doing the outlines with the paintbrush tool.

After the key poses were done I started doing the in-betweens. The way I went about doing them was starting with the character layer, then the wings and then the tail. I would lock the rest of the layers I wasn't working on, and whenever I started the cycle again, I would hide the layers above the one I was working on, to avoid confusion and to avoid messiness. That way I didn't feel too overwhelmed by animation the same thing, but instead, I got one pose done and then I moved to the next.
Similar top the sketches, I didn't worry about the placement of the frames and adjusted them once I was done with all of them. I added an in-between for all the original poses. I adjusted the frames to they were in "threes" (which I would change later on) because in twos the animation was way too fast.

Once I finished with the outlines I started thinking about colouring, because this is the scene I am the most concerned about when it comes to colour. I had an idea of what I wanted the colour change to look like ( since the character is slowly turning into light silhouette all colour will eventually turn into one) but I was thinking a lot about how I am going to make multiple colours turn into one. So I did a little test, having 3 colours on one layer, and then turning them into one colour, using the shape tween.
The different colours would fuse and move, which I don't want to happen. This means that I will need to have all colours on different layers and separate shape tweens. In addition, if I change the shape of the object I have applied shape tween to, animate would try to make a transition for that as well, and that would usually look very weird. Now since I have watched the tutorial on transformation before the project, I knew there was a way to change the colour using "mask" (since it was used there). I needed all of the colours to transition into bright yellow (maybe white with yellow/orange glow).
I went back to scene 4 and started colouring the jacket to try out the masking. I used the brush tool to colour and coloured all the layers where the jacket was still quite prominent (I have to colour the parts that I want to be visible when I apply the mask). I coloured the jacket in red, as it should be. Then I created a new layer underneath and created a rectangle, big enough that the jacket would fit in it even after the character has become a little bigger in the following frame.

Then I created a keyframe where the jacket is no longer prominent and set the colour of the box to yellow (the colour of the box in the first frame is the same red as the jacket). I had to right-click on the layer above and select "mask" and that makes the bottom layer a mask. Then I right-clicked and select shape tween, and the tween is done. I had to do the same for the shoes of the character. When I was doing the skin of the character I decided that that will be base of the transformation since the rest of the body parts' transformation was no longer after a point. I put the skin layer on the top and once the jacket and the pants' colours faded, the "skin colour" layer replaced them.


I coloured the trousers until they were no longer defined but I didn't add a mask or tween, because the colour changed actually looked quite smooth without them.
I put all of the colour frames in one layer so I don't get anything mixed up.
Once the colouring was done I started to think about the end of the scene where the light silhouette covers the whole screen. I tried that option using the camera tool and using classic tween to scale up the figure, but once it was done it just wasn't what I wanted from this scene.
I was trying to think of a way to create a flash or something like a light that will gradually become denser and cover the screen. I knew how to do something similar in After Effects, but I wanted to know if there is such an option to achieve something similar in Animate.


I found a tutorial on youtube on how to fade scenes. I followed the tutorial and on a separate layer I created a rectangle using the "Rectangle Tool". I made it very light yellow. Then I had to click on the object and on the righthand side, where the properties are I went to colour effect and clicked on "Alpha". Under the "style" there is a slider bar with percentages next to it. This was the opacity of the object. Using the slider bar I could manipulate the opacity/ transparency of the object.
I created a keyframe very close to where the transformation ends. and I decreased the opacity of the object to 4-5%. then I created a new keyframe a bit after the transformation has ended and then increased to opacity to 75% (I didn't want to go up until 100%, I just need enough to cover the outlines).


I went back to review the scene and thought that it might be a bit too quick, so I will go back and add a few more in-betweens and adjust the colours. This could take a while since I have already done most of the colouring, but I am hoping to get this out of the way as fast as I can.
After I added a couple of more in-betweens (I did one between all of the original frames), the animation started looking much better but obviously the colours were out of place, but that I will leave for later. I adjusted the frames to be on twos, instead of threes, and just left the last 4 frames to be on threes. I saved the original version in case I want to go back to that and use the colours and just adjust them slightly but I'm going to do that together with the colouring of the other scenes.
After some more reviewing, I just wasn't happy with how the scene looked like, which is a shame because it started off looking amazing, but the closing of the scene just wasn't looking the way I wanted it. I decided to add a bit more to the end where the scene is covered gradually by the light. I want to add more of them because I don't like that the transformation stops when it should be continuing.

I added a few more poses in a similar way as the does before. I sketched out what I wanted first (on the guide layer, then I started working on the outlines. Unlike the beginning of the movement the end as much faster, because I did fewer in between, however, I didn't need to add any because I intended to make the transformation faster towards the end. Also, I put the new frames in twos, because of the movement looked very unnatural when it was on threes. I also had to adjust the fade effect at the end, so it matches the new frames. I moved it so it the animation is still going when the fade becomes dense enough to not be see-through anymore.
Below is an explanation of the new frames and the old frames and how their positions look like:

The original scene, frames on twos.
The new version, frames on twos.
The original scene, frames on threes.
Scene 5

I haven't zoomed out the scene using the camera tool yet, in fact, I'm going to do that once the scene is done, to avoid complications. This means that I will need to have everything done, with the zoom out in mind.
For creating the key poses I used the technique that I used for scene 4. I sketched on a guide layer, using the brush tool as usual. I was very quick with the sketching because I have a lot of experience drawing dragons so I didn't have any challenges there.
I drew the beginning and pose and did one in between, and then drew a pose between the beginning and the middle, and one between the middle and end. That Included movement of the head, wings and one of the legs, though it is a very short one.


Once the wings and the head key poses were done, I went to animate the eyes. In this short part, I have to animate the eyes of the dragon open before he lifts his head up, so I went a bit towards the beginning and added couple of frames to give myself some space to animate the eyes
I thought this would be a good opportunity to use anticipation, though it is a truly small part. I really haven't had the chance to apply many of the 12 principles of animation, and I thought applying anticipation to this specific part would look quite good. First I drew a line for the closed eye, then on a new keyframe I drew the eye bigger then I wanted it to be, and on the next keyframe, I drew the eye slightly smaller than the previous.

After the sketched animation was done I started doing the outlines. I drew put all main body parts on separate layers, the head, the body, the wings, and the tail. I usually use the paintbrush on size 1.00 or 1.50 but this time I wanted to go for thicker lines so I went up to 2.50. I am usually scared to go for thicker outlines but they seem easier to work with, and small mistakes are not standing out too much.
Once I finished with the key poses I started doing the in-betweens. I added on in-between in front of all the frames between the first on and the last one. I tried adding more for more smoothness of the animation, but that looked very unnatural so I stuck with the first option.
When I was animating the head of the dragon lifting up I used the free transform tool to change the anchor point of the object and placed it where theoretically the head is connected to the spine of the dragon. That way I could make the dragon lift his head realistically. I would rotate the head to lift it. I had my onion skin on to show me the previous and the next key frames.

I only did one wing since the second one will be covered by the front one. Similar to the head I used the onion skin to see the prvious and the next frame. Animating the wings was quite easy since I have already done 3 animations animating wings (one of which is the 2nd scene of my FMP animation).
There was not much to animate on the body of the dragon, since it was mostly static, aside from the neck that was rising with the head, and the right from the leg, That was slightly raised at the beginning and I just made the dragon step on the ground with it. The animation of the leg was 4 frames long and had two in-betweens. I did this very quickly and it turned out quite successful.
I adjusted the frames so they were on threes. I originally wanted them to be on twos, but it didn't look good on twos so I just went for threes, and it worked out great.


After the motion was finished, I just added the camera effect. The zoom out started slightly after the dragon opened his eyes, and finished when the dragon ad his wings open. I added more frames after the zoom out was complete just to keep the pose for longer so the viewer can have time to see the dragon. I applied the same to my other scene that had any camera movement
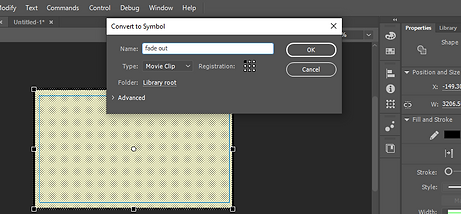
It was time to add the fade effect transition that I have started in scene 4. I need to do the same but reverse at the opening of the scene. I added a keyframe a the beginning of the scene and added a rectangle of the same colour to the one from scene 4. After I added it I converted it into a symbol and named it fade out.
Then I created a new keyframe a little before the eyes were going to open. Then I clicked on the object and clicked on the frames to create a classic tween. When I did I noticed that my fade didn't work. I tried couple of more times but none of them worked. I went to the video that helped me to do fade and watched it over to see if I missed something. I noticed that I had to use Motion Tween instead of classic tween.


I repeated the steps ut did motion tween instead, but it still didn't work out. I tried a couple of times again, but nothing seemed to work out. I was getting worried and as confused why it wasn't working out. I watched the tutorial again. I noticed that the person doesn't add a keyframe for the end of the tween. They just went to the end frame and increased the "Alpha" factor and that created a dot on the frame. I repeated the steps and instead of increasing the factor "alpha", I decreased it. I was hoping this would work, and thankfully it did. I realised that I forgot something I did only a couple of days ago, so it is important to always have the tutorials of new things I learned.

Colouring
After the animation was done it was finally time to colour. I am hoping to finish colouring as soon as I can, Because I haven't planned when I am going to do the backgrounds, and I will probably have to do them during week 11.
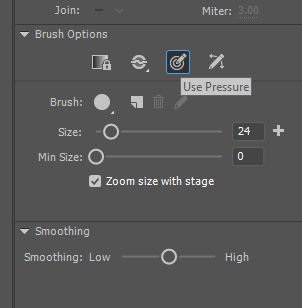
Before I actually started colouring I found how to save swatches, other than the default one. I found this in the swatches panel. I just need to create a new folder by clicking on the folder icon, then select the colour I want to save to this folder and click on the layer icon in the same panel, and a text will pop up saying "Create a new swatch", and when I click that that creates swatch in my folder. I did the same with all the colours I needed for the character, and I will probably end up adding more. This was a very useful discovery because every new scene I would have to use the eyedropper tool oget he couloir I need.


Originally I wanted to do all colours on one layer, but I stared ding the jacket on its own, so I decided that I would put have a couple of layers that have colours that do not overlap, so it would be easier to colour, So that way I had the skin colour and hair on the same layer, the jacket on its own, the grey shirt black belt and boots on the same layer, and the trousers on their own as well.
I would adjust all the colours on the same layer together on each new keyframe. I would sometimes use the Free selection tool to scale up and change the shape of the colours, so I have as much colour inside the outlines as possible to the I wouldn't have to colour that particular part over and over again. Sometimes the previous frame would almost perfectly fit the new one and I just need to adjust a little and that spares me a lot of time.
For the skin, and the hair colour I had to go and search for some references, as I am not very experienced in picking the right colours, as most of the time I work in back and white, and this is a good opportunity to learn (More about colour references will be on my Research page). To import images to animate I have to get to file-> import->import to stage. For importing I created a new animate file, so the images don't get messed up with with the animation.


I gave it another go, using the classic tween again, but for some reason, it didn't work so I used motion tween instead. I used the free selection tool to adjust the colours accordingly, so it fits the outlines. Thankfully the motion tween worked out just fine. I plan to later investigate what the problem is with the classic tween, but if I can achieve my goals using a motion tween then I wouldn't worry too much.
I had a tween at the end of the scene and I needed the colours to follow the outlines. I was thinking a few ways to do that. I was thinking of using classic tween. However to use the classic tween I needed to turn the head into a symbol. I did so and then I realised that on the same layer I had the colour of the arm, and that was moving too, and I didn't want it to. I duplicated the layer and cut all the games before the point where the head looks down. On this layer, I only kept the arm colour, and on the original I deleted it.


Once I was done with scene one I moved to scene 2. I coloured the character quite fast. All the colours were on the same layer, as there was no movement of the character at all. To make it easier to colour I chose to move further down the time ruler, whee the camera has zoomed out to show the whole character. The keyframe is still at the beginning. That way the character is smaller and fits the white area, so it is easier to colour.
After the character colours were done I moved on to the wings. I created a new layer for the colour and placed over both the character outlines and the character colour. Later on, I plan to put the colour layer in the folders for each wing, but for now, I will keep them outside. I only started colouring the right-wing. I plan to copy the layer and flip the colours in order to use them for the left-wing.


On every new keyframe, I would keep what I had on the previous one, and see the free selection tool to make as much colour to fit inside the outlines, and wherever there was some white space I would just fill it in with the brush tool. I would draw with the brush tool to draw around the outlines, and then I would use the paint bucket tool to fill in the empty spaces.
Before I started colouring this scene I decided that I would use a colour change, for the wings to go from yellow to ashy grey (the colour of the dragon). I felt that that way the scene would look even more interesting and would give me the chance to practice more with the colour change before scene 4, where I am supposed to add a lot of shape tweens to different layers.

I created a new layer for the mask. I put both the wing colour and the to be mask layer in the right-wing folder. I added a rectangle with the same colour as the colour I have used for the wings.
I created a keyframe where I wanted the colour change to stop, and then I changed the colour to ashy grey. Then I added a shape tween to that, and then I right-clicked on the wing colour layer, and selected "mask".
Once the shape tween was done, I moved on to working on the left-wing. I copied both the wing colour layer and the shape tween layer I knew that If I just move the colour the shape tween will still work, so there was no point of making a brand new one. I lock and hid the tween colour and started working on the colour for the wing. I right-clicked on the colour went to "transform" and then I clicked "flip horizontal". Then I just moved the colour and made it fit inside the outlines.

I did the same each for every frame, and surprisingly it wasn't as time-consuming as I originally thought it would be.


After I did that, I wanted to add some glow effect to the outlines of the wing. I went to the wing outlines layer and locked it. I clicked on the final frame where the wings were wide open. I decided that if I am to experiment with glow effect this would be the perfect position of the wing to use. I went to the properties panel and added a "glow" filter I changed the colour of the glow to orange, and I played around with the values, to see which one gave out the effect I wanted. I found something I was happy with, but then I needed to paste the same filter to the rest of the frames, and also the other wing. On the filters panel on the top right side, there was I cog icon, which I clicked on. It said copy all filters. I clicked on that. Then I selected all the frames I wanted to add the filter to and then I went to the cog again and pressed "paste filters", which was the only available option.

I went to the other wing and selected the outline layers there, and pasted the glow effect there as well.


Similar to scene 2, Had all the character colours on the same layer. I had to make sure that as the camera moves to the right, I haven't missed any spot on the character.
Then on a separate layer over the character outlines and colour, I created the colour layer for the wings.
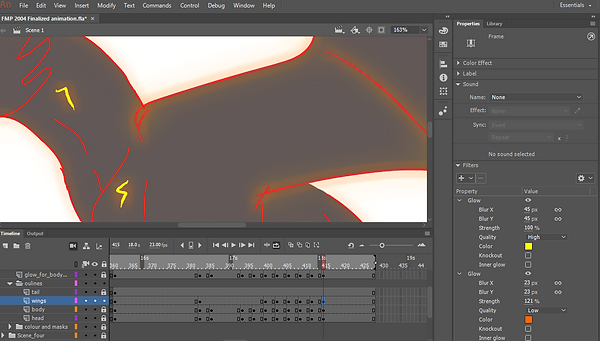
I used the same colour as the wings from scene 2, for the wings, and then over the colour I added yellow lines, and added the glow filter to them, to make them seem like cracks.


This time I added two filters for the glow, to give it more depth (for both the wings, and the cracks, and the tail outlines). Like the 2nd scene, I used the copy filters and paste filters option, to paste the filters to all the frames that needed to have it.
When I started colouring the tail, I used an ashy grey that was slightly darker than the wing colour, because I didn't want them to mix. They are very close so the difference is barely visible, but enough to make sure that they don't look the same.
Once the first frame was done, I would just use the free selection tool to adjust the tail in a way that, I am able to fit as much colour from the previous frame as possible.


Similar to what I did with the outlines of the tail, I copied the frames of what I have done s far and pasted them so the tail movement "loops" for longer.

I started scene 5 by colouring the jacket of the character first. Since I have already tried to colour this particular scene before I knew how to approach it. I knew that this scene will take quite a while to colour and to add effects to.
Firstly I coloured the character and left the wings and tail for later. Every colour that I added was on a completely new late. I had to make a mask for all of them because they would be changing colour but I couldn't have different colours on the same layer so I need a new one for each colour.
I had the pressure sensitivity on when I was using the brush to colour, so I don't have to change the size of the brush every time I wanted to colour small details.


To colour, similar to the previous scenes, I used the colour that I wanted the part of the character to be before he turns into a light silhouette. I would only fully draw the first frame and with the following ones, I would just use what I had from the previous frame and take or add from it.

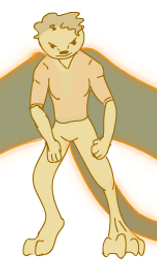
Sometimes I would encounter something like what's on the screenshot on the right. Since I had a lot of similar problems in previous scenes I knew what to do. I went to the outlines layer and erased all the necessary.

All other layers, except the "skin" layer, end quite early on, and the lines of the details of the clothes hair and etc. were starting to go away one by one. I had to make sure when I lines were gone I was keeping the colours in their borders. This wouldn't be so prominent in the final outcome because of the colour change, but working on these without lines was quite weird.

When I finished with the jacket, trousers and the skin I played what I had so far to see if I was missing something. I found there was a frame where the legs weren't coloured so I went to that frame and coloured it in.
After this I went to colour the small bits like hair and the boots.


once that was done as well I started adding the shape tweens and masks to all of the layers. I went through the same process as the first time I did masking. This time I was much quicker when I was doing this because I had the opportunity to use this effect quite a few times, so I was very confident doing this.

After the character was done, I moved on to the wings and tail. Since there were a lot of character colour layer I put them all in a folder inside the main scene folder so clear some space.
I first started with the wings because I knew they would be more time consuming than the tail. I used the grey colour from the previous scenes .
I coloured the first 4 frames, then I thought that I already have coloured the scene before, yes there were some frames missing because when I was animating this scene I decided to add few more in-betweens, and more at the end. I thought I could use the ones that I have, to reduce my work down by like 40%. I went to the file where I originally did scene 4 and copied the layer with colour only. Then I pasted it to the main file, right above the layer for the colour of the wings. I had to adjust and move the frames so they matched the outlines, and then I started moving them to the layer that was working on. They were a different colour of what I started with but that doesn't really matter because I am going to add mask to the wings anyway.


Using the ready coloured frames were very useful and really reduced my work time.
When I reached the frames where some parts of the dragon were outside of the white space, I didn't colour what was outside, because I knew there was no point of doing it.


After the wings were done I created a new layer for the tail and coloured each frame using the colour I had saved from scene 3. Like previous scenes, I would only fully colour the frame, and the rest I would try to adjust what I already have from the previous frames so it fits the new one, using the free selection tool, lasso tool, and the regular brush and eraser tool.
When that was also finished, I added the shape tweens to each layer and created a mask. The end of the colour change for the wings and tail would end earlier than the skin colour change. The colour of the skin of quite bright so the change happens quickly. On the other hand, the wing and tail are quite dark, so the colour change takes longer. The problem in this is that if I have the skin, wings and tail colour change lined up in a column, I would find that in the earlier frames, The skin would have almost finished its transformation and the wings and tail would still be quite dark.


I moved the end frame of the shape tweens fro the tail and the wings, to an earlier point of the timeline.


Now it was time to add the glow effect and to adjust the colour of the outlines. I stared with the wings first. Since in scene 2 and 3 the outlies of the wings were red, I changed the colours here as well. I only did so while the wings were still quite dark. Then I choose orange and changed the colour of the outlines until the figure was very yellow, and then I choose a bit darker yellow for the outlines.


(I did exactly the same for the tail. I made sure that I switched the colour of the outlines, whenever the colour switched on the wings))
That way I can achieve a gradual colour change, without needing to use any tweens.

Now I had to add a glow effect to the wings and the tail. I went back to scene 3 and went to one of the frames of the tail. I went to filters, and like I did to add glow to the tail in scene 3, I clicked on "copy all filters". Then I went to the wing outlines layer selected all the frames and I went to the filters panel again and clicked on "paste all filters".

I added the filters for both the wings and tail. I was how it looked so I kept the filter and I didn't add to change anything.


I created a new layer and then went to the character outlines layer and copied the frames where the colour of the outlines of the wings and tail had turned bright yellow. Then I pasted them onto the new layer. What I planned to do with this layer was to add a glow effect to it. I don't want to do it on the original layer as the glow is also added to all of the lines on this layer, and I only need glow on the outside only.
Before doing anything on the new layer however, I went to the character outlines layer. My goal was to change the colour of the outlined. For the first couple of frames, I kept the outlines black, the way they were before, then once the character started getting quite bright I swapped the colour of the outlines to dull, ashy orange (looks kind of brown) and stuck with this for several frames. Then when the character has turned bright yellow I swapped the colour of the outlines with yellow, but a slightly darker one so it wouldn't mix with the colour of the body.


That way I can achieve a gradual colour change, without needing to use any tweens.

I went back to the new layer I made and named it "glow for body". My plan is to erase everything in the middle. I only want to have the linking that determines the silhouette of the figure.
I did so for all of the frames on the layer, and then changed the colour to yellow, the same yellow I used fo the original online layer.
Since the frames on the new layer, were from the section where the colour of the outlines of the character, wings and tail were yellow, I didn't have to work with any other colours when I was changing the colour of the outlines on the new layer.
One I finished erasing all that I needed and I changed the colour of the outlines, it was time to add glow to the layer. Firstly I pasted on these frames the filters that I already had from previous times I added glow effect. I wanted to change them a bit and see what happens. By an accident, I Pasted another set of filters to my already existing ones. The glow actually looked quite nice, but I decided that I wouldn't use it in this animation, because I had to apply that to the wings and the tail, and they were already done. Also, I think the glow was a bit too much and I didn't feel ready to work with it.


In the end, I got rid of the extra filters and pasted the ones I originally planned to use. That pretty much summed up scene 4.
I went back to check if I had missed something and to see if I liked everything. All seemed good and I was happy with how this scene worked out.
Once scene 4 was done I moved on to the final scene. I was sure that it wouldn't be as time-consuming as scene 4, but I still wanted it done as fast as I could.
When I was colouring, the body, wings and tail colour were on the same layer. This is because the tail had no movement and the wings movement were not coming to have a negative impact on the rest of the body.


However, just in case, I had the head colour on a different layer. In general, the colouring was quite fast and easy. I used the colour I used for the tail from previous scenes. I just like how warm it looks, and I feel like it fits better with the yellow glow.
When I was colouring I started from the end and moved towards the beginning of the scene since at the beginning the scene is zoomed in to the head of the character, and the rest of the lines are barely visible on the black "background"
When I was colouring the head I Just drew the first frame and then I would just use the free selection tool to change the anchor point of what's selected and then rotate what there was. I would try to fit the colour inside the lines of the head. When I was rotation I would just have to add a bit on the side with the brush tool to fill any spaces.


Once the colouring was done I went to the lines layer and changed the colour to red. I changed the colour, for the linework layers. I kept the eyes of the dragon black, by selecting them after I have swapped the colours of the linework to red, and then change the colour to black.
I copied the glow filters from scene 4 and pasted them to the tail linework and wings linework.
Then I copied the head and body linework layers and pasted the above the rest of the layers for the scene. Then I right-clicked on the head layer and clicked on "merge", to merge the copied layers. Using the eraser tool I stared erasing all that I didn't need in the middle. I just need the outlines, in order to add the glow effect, similar to what I did in scene 4.


Then when I finished that, I added the same glow filter to the merged layers, as the ones on the tail and wings, and that way I kept the original body and head linework clear of any glow effects.
I didn't colour the fluff on the tail because I planned to make it look like fire, like how I have it on my drawings and sketches.
I went back to the linework and erased any lines that cross the border where it should end, otherwise, the linework looks very messy. There were quite a few of those and they were all on different layers so I had to jump from a layer to a layer, which I actually find quite easy and quick now that I have had worked in animate thought this project.

I had to use the same colour of the dragon's body and create a new layer in order to hide some lines, in particular, the one where the tail line work was crossing the linework of the wing. I had to make a new layer and place it between the wing and tail, and the cover line. I had to create few keyframes, to get rid of the colour gradually as the wing opened.

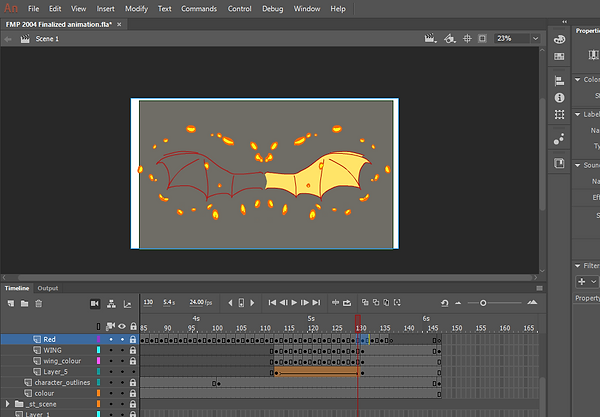
In the end, I created a new layer at the top of all previous ones in this scene. I was going to use this layer to draw the "cracks" on the skin of the dragon. I set the brush tool on yellow fill and then added the glow filters to make the cracks glow. I drew those clack on parts of the dragon that was going to static for the entire scene, and that way avoiding animating them.

This is how the coloured version looks like, now all that is left is to do the shading which I hope will be quite a fast process.