
Planning and Production

Planning and Design
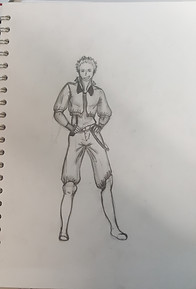
Here I have some sketches and drawings where I explored ideas for my character and their design. After the human anatomy tutorial I watched I feel like am better at drawing the human figure.
I tried different outfit designs to see how they work out with what I learned about the human anatomy. I realised that I will have to make a research on clothing and how it fits when worn.
The drawing on the left is a example design of what I want my final piece to look like. Currently I am trying out different designs so I can finalise my idea and start production. After drew this I realised that I may need to look at some tutorials on how to draw wings and feathers, because I feel like that is going to be one of my biggest challenges during the process.


04/02/2019 (week 5)
I imported a photo of my sketch from my sketchbook to the Mac and started working in photoshop. I started with the 10yr old by tracing the outline and the basic shape without any colours, yet. I traced different body parts and details on different layers, so I can have the freedom to change something in the future or for animation. When I was done tracing I hid the original drawing but I kept it just in case. I started to fix and clear the digital sketch. I mainly used the brush and the eraser tools for this bit of the process.

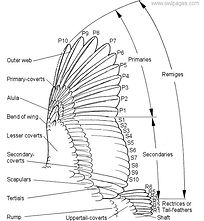
Before starting with the wings I found realistic reference image that I can using when working my drawing. That doesn't necessarily mean that I will make the wings look realistic.

*I named my character Atlas, so I may be calling him that while describing the process of the production*

05/02/2019
I started working on the second character using the sketches I did in my sketchbook. The process was almost the same as the previous character but this time I had more to work on the wings as they were bigger than the 10yr. old version. In addition I experimented with the clothing. I was inspired by two different shows regarding the outfit of the character. I like how the puffy pants look on him, especially with his wings.


I adjusted the wings and added the tail. I made the tail longer than the original. Also I looked at some tutorial on how to draw tail feathers and fluff. I used the images I found just as a guide when drawing. I changed the pants a little from the original. I made them longer as I like how it looks more than the short, original one.


On the the last day of the 6th week I started on the last version.
I uploaded the sketch I did in my sketchbook and then started tracing it in photoshop using the brush tool again. This one I planned to do with bigger wings so I can show physical development of the character.
Some of the images I looked up, I plan to use as a reference for the colouring.


11/02/2019
Today I concentrated on colouring and shading one of the works. I used the image I looked up earlier on as a reference for colours and shading. The image was very helpful since it gave me palette ideas and helped with shading.

I looked up at some images that show coloured wings, which I believe will help me working on the wings of my character. I also looked at my real life inspiration- the peregrine falcon. I noticed that the wings are white or at least brighter than the main colour of the wings so I think that this was a useful thing to keep in mind while working on the wings of my character.
I noticed that some artists used very weak outline for the wings, which I really liked because it creates this felling lightness, so it matches the nature of the wings.
12/02/2019


Today I was finishing off some of the last details of the 30yr old character. After I was done there were still some things I had to do but the majority of the work was done. I mainly used the brush, the eraser and on occasions the eyedropper tool to pick colours from the reference image. I used the technique of not very bold outline for the wings in order to bring that feeling of lightness and to create contrast between the body and the wings.


I still need to do some work on the face and the head feathers but I plan to do That after I finish with the rest of the characters.
I started colouring the second character. I used the same colour for the wings as the one before. The process was easy while I was working with the base colours, but when it came to shading I started having trouble, so that means I will have to look for a reference for the wings. But I decided that I will finish the shading and the colouring of the other details of the characters that are left before making a research on wing shading, so I moved on to the other bits that needed to be finished.


21/02/2019
Today my goal was to finally finish working in photoshop and start working in After Effects for the presentation. I successfully finished the production in photoshop, by adding the missing details like the feathers on the head an the drawing the face on the 3rd version of the character, since it was the only one that was fully rotated towards the viewer.


I did some final touches on the shading of all the versions of the characters and cleared the outlines a bit so the overall image looked neat. For now I think everything looks ready to go to after effects, but if there is anything I need to fix, I can always go back to photoshop and fix it.
The wings were little hard to shade as I didn't know where and even reference images didn't help so I decide to try and apply everything I knew and try I and make the wings look a bit less flat. I used the blur tool on some occasions, even thought the style of the work was different I thought that blurring the colours a bit will help and I was right, at least from my perspective.


10yr old
20yr old
30yr old
22/02/2019
After I was done with the work on my character in photoshop me and my friend moved on to after effects to work on the presentation of the work. First we uploaded the background file and my character's file. The previous day I did some cleaning and got rid of unuseful layers and merging some layers together. Before we started we opened after effects and explored the camera options and how the animation will go.
The presentation of the 2D layers in 3D is going to look like one of the practicals we did in Maya. In the beginning the entire thing is shown to look flat and 2D, later as the camera rotates the layers are being shown. We decided to go a bit further and made the camera go back and show the layers from the other side.


We parted the layers a bit before animating the camera, as they were a bit too close. To do that we went to the layer we wanted to transform, clicked on transform and clicked the clock next to position to create a key fame, and moved the layer we choose from there.
We made the animation 10sec. long as we thought more than that will be too long and will end up as slow rotation. On the top of that this a way to incorporate the theme of 10 20 30 to the project alongside the presentation of my character and the number 30 in the clouds of the background.

We we decided that the animation was ready we moved on to rendering. To do that I looked back at a pre-rendering practical we did from the last project, to help me remember how to render. We went to "file" on the top left of the screen then to export and clicked on "Add to Adobe Media Encoder Queue...". There was another way we did the rendering- we clicked on the on the " Add to Render Queue" but after rendering the file was too big so it didn't open, o we tried the other way. When the Adobe Media Encoder opened we selected the H.264 format.
This is the background my friend did.


These two videos are two different versions one made by me and one by my friend. The in the original one the characters were bigger but did not follow the 1st point perspective by which the background was made. So I thought I can redo and fix the characters according to the background. So I made each a little smaller dependent on where they were. I made the flaying one to look smaller than the rest as it is furthest from the viewer. When I was working with the one with the blue pants I had to hold the "shift" button so I could fix his proportions as he was overly stretch, and I did the same for all the characters. The one that is the closest to the view I changed very little as I thought that the closer the character is the bigger they seem.