3D Modelling using MAYA
This was the first time I used Maya so it was definitely very exiting. On this first tutorial I leaned how to make an object, learned about the basic transformation tools like Move tool, Scale tool and Rotate tool. By using them I created simple shapes like spheres and cubes.
For now we were instructed to keep the mode on 'modelling' as we just began to learn.
Here is the outcome of the first session:
-I used simple shapes like sphere and rings.
I tried to make a human figure with the new learned skills but it turned out be little angular. I did not expect more than what I had made.


This images show the second workshop on Maya where I just practiced what I learned the last workshop.
I challenged myself to make I castle. I used simple shapes like cubes and cylinders. I used the move and the enlarge tool to put the shapes together. Then I went to windows and then to outliner, marked the objects and grouped them so the stay together.
I also changed the option of the object by right clicking and holding, while the object you want is clicked on. There are few modes - object mode, edge mode, face mode and vertex mode.
I mostly used face and vertex mode to make the castle.

Creative text Using Photoshop
Comparing the techniques I used creating text.

This image shows two different types of text techniques that include different fonts and layer styles. The first text has the font '' Blackoak Std''
and size 130 pt. To change the colour of the text I used 'switches' and 'color' that can be found on the top of the right side box. On the bottom of the same side the layers can be found.
This images show the layer effects I've picked to modify my top text. The left image shows a bit more detailed picture of what the blending options present. On the right, in the middle there can be see a text preview on the top of a box that has a square in it that show the effects of the options chosen before it being applied on the actual text. I have increased the depth to increase the 3D effect of the text. I did not add contour or texture to the top text. The bottom text has more effects added to it and different depth and size of structure


This box shows the Layer effects and styles that can be chosen to customise the text.

Get to know the Adobe illustrator interface


For this tutorial I had to make a closed shape and apply the gradient tool on that shape. So I decided To do something similar to a shell and use gradient tool. I set the gradient type on 'radial' to make it seem as if the colour changes with the next shell layer. I added few quite bright colours, and applied them.
To add colours however I had to do the shape first. I used the arrow tool and the pen tool.

Learning how to Animate.

2D Animation
To make my first 2D animation I used Adobe Animator. The process of 2D animating if quite time consuming, but very interesting. As a starting point we were given a task to animate a bouncing ball. To make I used the shape "circle" from the tool bar. I adjusted the size of the shape. To create the movement effect I had to use different frames. Each frame had the same shape but scaled and placed somewhere else differently to create the motion of the all falling down and bouncing up.

This image shows the frames of a single layer.
This image Shows two layers and the number of frames.


3D Animation

On my opinion 3D animation was easier and faster than 2D however I enjoyed it less than 2D. Two main thing I thing that need to be remembered are S to mark and the time line.
To animate you click S at the point you want to start at, then you click on the place you want click S then move, rotate or enlarge the object you want and then press S again.
The "timeline"

I grouped different objects together by opening "Outliner" in the menu "Windows".
To imitate the movement of flight I moved the object up and down and marked the final position on the timeline. The red, thin lines on the time line show the marked points.


Learning the basics of Adobe After Effects

To open a new project, I have to go to file and click new and then new project. I have to make sure that I got this on effects, as that is what we are working on now.
To experiment with text I need to create text layer first. To do that I have to go on the top left and find the 'T' icon for text, and then I write the text I want.
I can change the anchor point of the object or text by using the "Pan Behind (anchor point) tool". By using this tool I could move the anchor point wherever I wanted. So from my point of view this is quite useful while animating a text in posters and adverts.


To animate I need to go to the layer I want to animate click on the arrow to open the options of effects and transformation. Click on transformation and choose what kind of transformation-rotation, position, size and anchor point.
To animate I need to create a key frame, and to create a key frame I go to the transformation I want or the effect and click on the clock and if it is blue that means I kan animate the text.

More on 3D
We received a workshop on how to turn a plain sheet into cloth and how to turn objects into passive collider.
To create the effect I need an nCloth and a passive collider. To create them both I need to go to nCloth menu on the top, then while the plain sheet is selected and click on 'Create nCloth'.

To create a passive collider I have to go to nCloth again and click on 'create passive collider' while the object you want to turn in a passive collider.
To see the effect, however I have to press space bar to turn on the animation. What happens is that when the plain sheet falls over the passive collider, it turns into cloth.


Attempt after a Technical Research.

After I was done with the research I decided to have a go and use what I learned.
First I choose a warm, dark gray background and then chose brighter colours and thin brushes for the outline of the stones. After I was done with planning and sketching I started to fill the stones. I used a black brush with rough texture to recreate the roughness of actual stones.


This was quite useful when it came to the point to apply this to my poster. However the same video also explained how to do lava as well as rocks.
UV Wrapping
Firstly, there must be an object to work on, for example a cube or sphere. Then the object must be named. This can be done if the windows, window is opened and then click on Outliner. Then a new material should be assigned.
To start the process of go on the UV window and click UV Editor. When the another window opens go back to UV and click "Automatic". Then arrange the faces of the objects in such way so it makes sense. When everything is done click "Image" and then click on "Create PSD network". Then when Photoshop is opened drag a wanted image the window. When the image is arranged click "file" and then "save". Then go back on Maya and click 6.
The image that was chosen then has been wrapped around the object.


Lighting
(Adobe After effects)


This images show what I mainly did on lighting tutorial. The key things we learned from the tutorial was how to add lighting to an image. To add lighting right click on the time line box go to new and then click on light.
We could manipulate the position of the spot and its radius by using the give arrows, each for different direction. When we got to animation I experimented with the position of the spotlight, its colour.
The animation I did mainly concentrated on what we learned from the tutorial. I changed the colour of the spotlight 3 times at different points.
I could also change the view by clicking on the drop don menu on the working window. The types of views included vertical, horizontal and more.


This screenshot shows what aspects of the spotlight. That includes the colour, the position, and the point of interest.

3D Lighting (Maya)

This tutorial was about 3D lighting using maya. I used plain sheet and a sphere to apply the light to. I used spot light for this. to do this I had to go to rendering and click on the spotlight and then aim for the sphere so the light can be seen.
When that is done I have to go to "Arnold" and then click "Arnold RenderView", which opens a window that shows the effect of the light.
However to actually see the effect well I have to increase the Intensity of the light. We were instructed to put the intensity on 10 000. I can find that when I go Attribute Editor and go to spotlightShape1 and edit it from there.


Also there were settings that can smooth the line of the light reflected on the plain sheet, for example.
In the same tutorial we experimented how the change of colour and material will look under the effect of the lighting.
Something interesting was mentioned during the tutorial, that is natural to happen. we realised that the further from the light, the less the intensity of the light is on the object.


Collecting Files and Pre-Rendering

To begin with I had to collect the files and put them together into one folder called "Pre-Rendering". To do that I need to go to 'file', then go to 'Dependencies' and then click 'Collect files'. When I click on 'Collect files' a window opens that has settings regarding the collection of the files. Right next to 'Collect source files' there is a drop down menu. That should be on 'All' as I want all files to be collected together.
When I am done with that I click the blue button 'collect' and that leads me to where I have to save my files. This is where I have to find my pre made folder called "Pre-Rendering" and save my files there. When that is done I can go to the next step.


To render the files I go back to my after effects file, then to 'file', the choose export and click on "Add Adobe Media Encoder Queue". The new versions of Adobe After Effects do not have the type of format we needed for the tutorial (H264), that is why we had to use the Adobe Media Encoder.
When the Adobe Media Encoder opened, I had to find the H264 format click on it

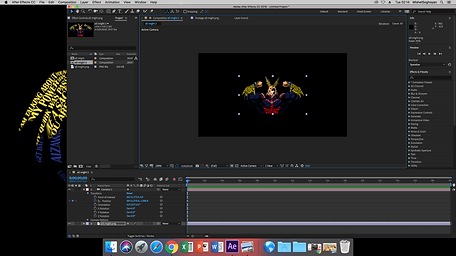
Camera on Adobe After Effects
(27 Nov 2018)
To begin with I created a new project in AE. Then I opened a jpeg file and imported it as a composition. I opened the composition and right clicked the box next to the time line box, to create new camera. To create new camera I go the same path as I did when I created new light-click on new and the camera.
The bottom image shows what comes after I clicked new camera. These are the settings that are available, like zoom or film size. This time I did not change any of the settings, but just clicked the button OK.


To see the effects of the camera or other effects like light, however, I have to make the image layer into 3D layer. To do that I click I lick on the empty box on the end of the right side. when you click on the empty box a cube should appear to mark it as a 3D layer.
After adding new camera I tried to change to position of the image, to put it little far from the view. To change the position I can either press P or go to camera layer, click to the drop down menu and and click the clock in front of 'Position'. then I move it far at the back, however that also scales the image down. To scale it up again I click 'S' and scale the image up by also holding shift to keep the proportions of the image.